If you haven’t learned by now, here in XWCL we like to get festive with decoration. We’ve posted our past Christmas decorations, but it doesn’t end there. We’ve also decorated for Thanksgiving, but it somehow never made it to the blog… until now.
Flashback to November 1st, 2017: Lauren and I decided that the office was in need of seasonal decor update. We put up a small Christmas tree and a door wreath. It was very lovely and festive. It didn’t last long, as we were immediately commanded to remedy the situation.
Back to the drawing board, I guess.
But, in this group, we do not easily give up. The next year, we came back with full Thanksgiving decor using contributions from members of XWCL and CAAO. I present to you, lovers of the blog, our beloved paper hand turkey decorations:
The 2018 paper hand turkey decoration wall, showcased on the bulletin board in front of Jared’s former office at N434. This is the same location we put up the Christmas stockings.
Paper hand turkeys are the epitome of Thanksgiving decor. For any person who attended elementary school in the United States, paper hand turkeys are the most probable fall craft on the agenda. In making our paper hand turkeys, we wanted to embody that same enjoyment from our childhood. I highly encouraged people to sign their name with their non-dominant hand and in crayon.
MagAO-X PI approves of the paper hand turkey crafting agenda.
Unfortunately, we never had the opportunity to redo the paper hand turkey wall. In October 2019, Steward Observatory was undergoing its first renovation and relocated the entire 4th floor north side personnel to temporary office space on the 3rd floor. Additionally, the MagAO-X team was busy in Chile with their first light run. We didn’t get our offices back until December 2019. We had no paper hand turkey wall in 2020 due to the pandemic. In summer 2021, we experienced an office shuffle. We moved to the conference rooms and offices at the other side of the hallway, with no bulletin board easily accessible to post our creations up.
Despite these lost opportunities, the paper hand turkeys continue to live on. Jared likes to keep his paper hand turkey on the bulletin board inside his office, so he can look at it year round in the few moments he sits in there. We currently have a few old and new ones posted up in the XWCL graduate student office space:
Paper hand turkeys in N412. The creativity is boundless! Photo credit: Logan Pearce
Happy Thanksgiving, from XWCL. If there’s anything I’m thankful for, it’s this research group – I’m making it to the finish line of graduate school strongly due to the assistance of everyone in XWCL and CAAO. I hope you, dear reader, get the opportunity to celebrate with who and what you’re thankful for.
Song of the Day
One of my staples growing up was the Charlie Brown holiday specials. My brother and I would watch them on VHS. I think at one point we accidentally had 2 copies of the Charlie Brown Christmas? I probably should watch this again, maybe today (if I don’t fall asleep halfway through from a food coma or writing my dissertation, whichever one comes first).
Vince Guaraldi Trio – Charlie Brown Thanksgiving Theme
Today is the Autumnal Equinox, the official end of summer and the start of autumn in the northern hemisphere. Autumn doesn’t really mean much here in Tucson, except our days of constant 100+F heat is waning down. (This does not barricade me from getting a PSL.) A more important date is 8 days away on September 30, which is the end of monsoon season in Tucson. Currently, we are at the 3rd wettest monsoon season this summer, a welcome break from last year’s missing monsoons.
While the Autumnal Equinox is a pretty neat phenomena that can be explained by any Astronomy graduate student at Steward Observatory, we have an additional event deserving a celebration: today is the 5th year anniversary of the arrival of the CACTI testbed in the XWCL!
For the uninitiated, CACTI stands for Comprehensive Adaptive optics and Coronagraph Test Instrument. CACTI is XWCL’s AO simulator testbed where we can tack on and swap components for testing and developing projects (particularly for many of XWCL’s optics graduate students’ PhD dissertations).The initial incarnation of CACTI was used to develop Kelsey’s dissertation on Linear Dark Field Control. The current version of CACTI began as the AO simulator of Lauren’s 3PyWFS dissertation project. At the moment, CACTI is serving several projects such as my laboratory demonstration for a cubesat laser guide star, Alex R’s demo of the differential Optical Transfer Function WFS, Sebastiaan and Meghan’s optical differential wavefront sensor, and Avalon’s Basler camera characterization. CACTI has endless capabilities, with only physical space and laboratory time as the limits.
To celebrate CACTI’s 5 year anniversary, let’s take a walk down memory lane to see CACTI’s evolution.
The CACTI table was moved from room N431 to the XWCL space in room 265. It was this instance where we learned we could not use regular movers for relocating an optical table. Instead, we required riggers who have access to a crane to lift and move the optical table. Though Jared was absent for much of the moving process picking up a pallet with Alex R, Dr. Kelsey Miller was able to record some of the process.
Sept 22, 2016: CACTI outside N431 and ready to begin its journey to 265 (Photos: Dr. Kelsey Miller)
Sept 22, 2016: CACTI now in 265, horray! (Photo: Dr. Kelsey Miller)
To prepare CACTI’s table placement, we used masking tape to set up locations where the table legs would be positioned such that the table would be balanced when craned down. However, no matter how well we measured and allocated tolerance regions, some table legs needed to go elsewhere.
Sept 22, 2016: Table balancing is an iterative effort.
Sept 22, 2016: A legend in the making, never to be forgotten.
These days, when you walk into XWCL, it’s packed to the brim. Some walking areas are only wide enough for a computer rack to pass through. It’s hard to believe that once upon a time, the XWCL consisted of the CACTI optical table, a few desks, and a bunch of shelves. It was also a time when Beast still did stuff.
Sept 30, 2016: Olivier teaching Alex R, Justin, and I how to perform surgery on Beast
Over the course of a year, the XWCL room started filling up more and more. This includes CACTI’s journey of upgrades. The first major CACTI facelift was the BMC 1K’s new air pressure chamber. Justin worked diligently through many different designs. The first prototype was a tupperware with a hole cut out for a window chamber. It eventually converged to the current chamber, custom built with holes for cable routing and an entrance for pumping in dry air.
The BMC 1K DM chambers through the years. Left: Original tupperware prototype with window. Right: Current version on CACTI
In summer 2017, CACTI was graced with a new addition: the Zygo Verifire Fizeau interferometer. It was promptly parked onto CACTI, along with the first and only Windows machine in XWCL.
June 27, 2017: The Zygo Verifire is free for use for all CAAO-related projects.
The Zygo Verifire has been an interesting learning experience. Beyond measuring and characterizing deformable mirrors, flat mirrors, and various LBTI hardware, it has bricked twice. Alex R and I tried to hook up the Zygo computer to the internet, only to brick the software because the ethernet port was for communicating between the interferometer and computer. We spent 2 hours on the phone with a Zygo engineer, who eventually stepped us through fixing the settings so we could connect the Zygo computer to the internet. Kyle, Kelsey, and I discovered together one afternoon that the Zygo uses Basler cameras. We installed our Basler cameras’ software on the Zygo machine, only for the software to stop working because the installation overwrote the required Zygo version. Luckily, we were able to revert to a recent, old Windows version state and undo our errors. Despite these unexpected inconveniences, the Zygo Verifire has been the backbone to very important work.
Sept 20, 2017: How to fix the Zygo. (Photo: Alex Rodack)
Soon enough, a new neighbor moved in next to CACTI: MagAO-X! After passing PDR in May 2017, MagAO-X began building in XWCL. The first thing assembled was the portable clean room, which arrived in July 2017.
July 26, 2017: Alex R (left) and Dr. Kelsey Miller (right) showcasing the newly built portable clean room. (Photo: Dr. Jared Males)
The arrival of the clean room meant moving furniture around in the lab.
July 14, 2017: Dr. Justin Knight shows us there is plenty of space behind the shelves for storage. (Photo: Alex Rodack)
From the get-go, the MagAO-X cleanroom was designed for portability that could fit above CACTI with minimal fuss. Early on, we identified the air ducts and lights needed to be moved and replaced so the clean room can properly fit above CACTI. That was something that got fixed.
Aug 30, 2017: Old lab ducts getting in the way of making science!
The next major CACTI upgrade was installing blackout curtains around the table. This helps considerably when an experiment is light sensitive. The curtains have allowed simultaneous non-CACTI laboratory work with the ceiling lights on while minimizing external source disturbance during data collection. Along the way, we learned that a top curtain was essential for an occasional ceiling pipe leak. We store all the DM drivers at the top shelf that a water leak on these electronics will destroy them. These electronics are not easily replaceable, particularly the IrisAO driver!
Oct 20, 2017: MagAO-X cleanroom with legs in foreground, CACTI with full blackout curtains in background.
Nov 14, 2019: Two years later, the air duct construction has its moment to shine. The adjusted ducts and lights, and the cleanroom moved over CACTI while MagAO-X and the team are in Chile. (Photo: Alex Rodack)
In 2019, Lauren and I designed an upgraded CACTI with custom lambda/10 OAP mirrors. In December 2019, we received the new OAPs and dismantled the original CACTI. We began building the new CACTI in January 2020. However, the pandemic hit halfway through our build process. Nevertheless, Lauren heroically trucked on and completed building CACTI in summer 2020 just in time to integrate the 3PyWFS from HartSci. In May 2021, Dr. Lauren Schatz finished her PhD using CACTI and the 3PyWFS was shipped out a month later.
Sept. 22, 2021: CACTI in its current form
CACTI continues to get lots of action in the lab. Open spaces on the testbed get used for small testing experiments. I’ve since added a secondary source to CACTI for my laboratory demonstration of LGS. Alex R and I have worked out a procedure for swapping the IrisAO segmented DM in and out of a pupil plane that can be done solo in less than 1 hour. Joseph, Lauren, and I wrote CACTI’s testbed operation entry in the MagAO-X handbook as a localized resource for users, to which I update regularly. Since CACTI utilizes a customized version of the MagAO-X control code, it also has the capability of being operated remotely. There are a few limitations though, such as the IrisAO DM driver power button requiring a physical button push.
Despite XWCL and CACTI’s evolution through the years, there remains one constant: the masking tape continues to hang out underneath the table leg.
Sept. 22, 2021: Masking tape under CACTI table leg. The excess has been cut off since the fateful placement 5 years ago, but it’s still there if you look closely.
Happy 5th anniversary, CACTI! Here’s to many more years of new development, more dissertations to feed into, and everlasting masking tape under the table legs.
With lots of love,
Jhen and Alex R
Song of the day
Given the focus on the desert (CACTI, rain, and Tucson), and our love for a connection to space/astronomy, we pick a song by Tucson’s own Calexico, who have been making their unique brand of “desert noir” rock since the mid 90’s. This particular song was picked by Rep. Gabby Giffords to be played in space on June 13, 2008, on the Space Shuttle Discovery as the wake up call for the crew including her husband (and current AZ Senator) Mark Kelly.
One of the most painful things I’ve had to do in graduate school is writing. It’s probably the worst necessary evil in academia. I’ll take documentation and giving presentations any day over writing papers. I’ve finished writing the first full draft of the MagAO-X Fresnel modeling paper and it’s going through the comment cycles. But this entry is not about academic writing, it’s about a writing the world as a whole has slowly started to forget about.
My first material love is paper stationery. It manifested during my childhood in the Philippines where I was first exposed to paper stationery shops. It’s a passion that has only evolved in the past two decades, even in the face of technology advancement. I exclusively use 0.38mm and 0.5mm gel and ballpoint pens because it keeps my handwriting the cleanest. I’ve been using the same Uni Jetstream 4-in-1 0.38mm ballpoint multipen and pencil my entire PhD because it writes so smoothly. I recently bought my first fountain pen and I’m completely hooked. There’s particular notebooks I purchase because the paper is smooth and sturdy with just the right level of brightness and no ink bleed through. I discovered dot grid paper a couple years ago when I tried out bullet journaling (bujo). I’ve since stopped maintaining a bujo, but dot grid paper is my standard preference for personal and research notekeeping. Paper stationery products are hit or miss and I’m grateful for Kinokuniya Bookstore in Little Tokyo, Los Angeles for being my first resource into exploring quality products.
A snapshot of my MagAO-X Fresnel model paper planning notes. Using dot grid is the best combination of maximizing blank space with the evenly spaced dots providing just enough guidance to write in straight lines. My eyes can focus on the writing instead of the grids and ruled lines.
While paper stationery usage is one thing, letter writing is a different game. Writing and sending cards occasionally was nothing new for me, but it became a regular thing when I moved to Tucson for graduate school. I was transitioning into a distance relationship and I missed a lot of my friends and family. I sent cards as a form of encouragement for myself and a lot of my friends who started their grad programs. Over time, card writing became my personal creative outlet.
I have maintained a few pen pal correspondences through the years. We’re never quite consistent; we regularly fall off the wagon from our correspondence streak as we each get busy and that’s perfectly fine. There’s no time constraints on these things and we help each other get back on track. We don’t write much, just little highlights of things we want to share with each other. I wrote to one of my pen pals about how excited I was about my monstera plant’s new unrolled leaf had not 1 but 2 holes in it. I’ve amassed so many cards from friends through my PhD that I’ve had to buy another decorative storage box to house them all.
My favorite part about letter writing is adding cute card flair. I love finding out about new stamps coming out and using them in my correspondences. My current favorite stamp is a lenticular printed T-rex. I get to learn cool stuff from stamps, such as Dr. Chien-Shiung Wu and her work in nuclear physics (my excitement for female Asian in STEM representation is off the charts). All my envelopes get sent with some sticker by the recipient address and sealed with washi tape.
My first time doing Christmas cards was in 2017, to which I mailed 43 cards. New Horizons got a commemorative stamp set when it visited Pluto in 2016, of course I was going to collect it and use them.
Letter writing has been my private getaway to detatch from a computer screen and hang out at local cafes. Just me, a drink with a snack, a small pile of cards, my favorite pen, and listening to music on my headset. It has brought me to appreciate taking in my environment. Of all the cafes I’ve visted in Tucson, Ren’s Coffeehouse in St. Philip’s Plaza is my favorite letter writing hangout (mostly because they also serve food).
During an internship in New Hampshire in Summer 2018, I frequented Terragia in Nashua, NH on weekends to write cards. Terragia had the perfect writing atmosphere – a small plant shop in a cafe. My second favorite local spot was The Bookery in Manchester, NH where it was a both a bookstore and a meal-serving cafe.
During my visit to Bhutan in August 2019, I would spend a couple minutes in the mornings to write postcards in my hotel room. I intentionally picked the room with an extra window to admire the breathtaking landscape from my desk; the photo doesn’t do a good job showing what I could see. Unfortunately, international mail is very finicky and it’s unclear to the status of these postcards.
In 2001, the USPS dedicated April as National Card and Letter Writing month with the goal “to raise awareness of the importance and historical significance of card and letter writing”. To challenge myself, I made a very lofty goal: write and send 100 postcards to people I know through the month of April. I chose postcards because if I’m going to mail 100 of something, I’m going to do it with the cheapest postage stamp. (Jared is only capable of paying me so much with the graduate student salary limits.)
I came into this project with a lot of pre-existing postcards. I’ve accumulated cards from all over the place: astronomy-themed cards from a past Art of Planetary Science show, Tucson–centric cards, and some funcards from Antigone Books. I completely burned through an AMNH illustration postcard set that has been sitting on my shelf for over a year. When I ran through my postcard supply, I bought a postcard set from an independent designer recommended by a friend. Postcards are fairly cheap to buy in a bundle set.
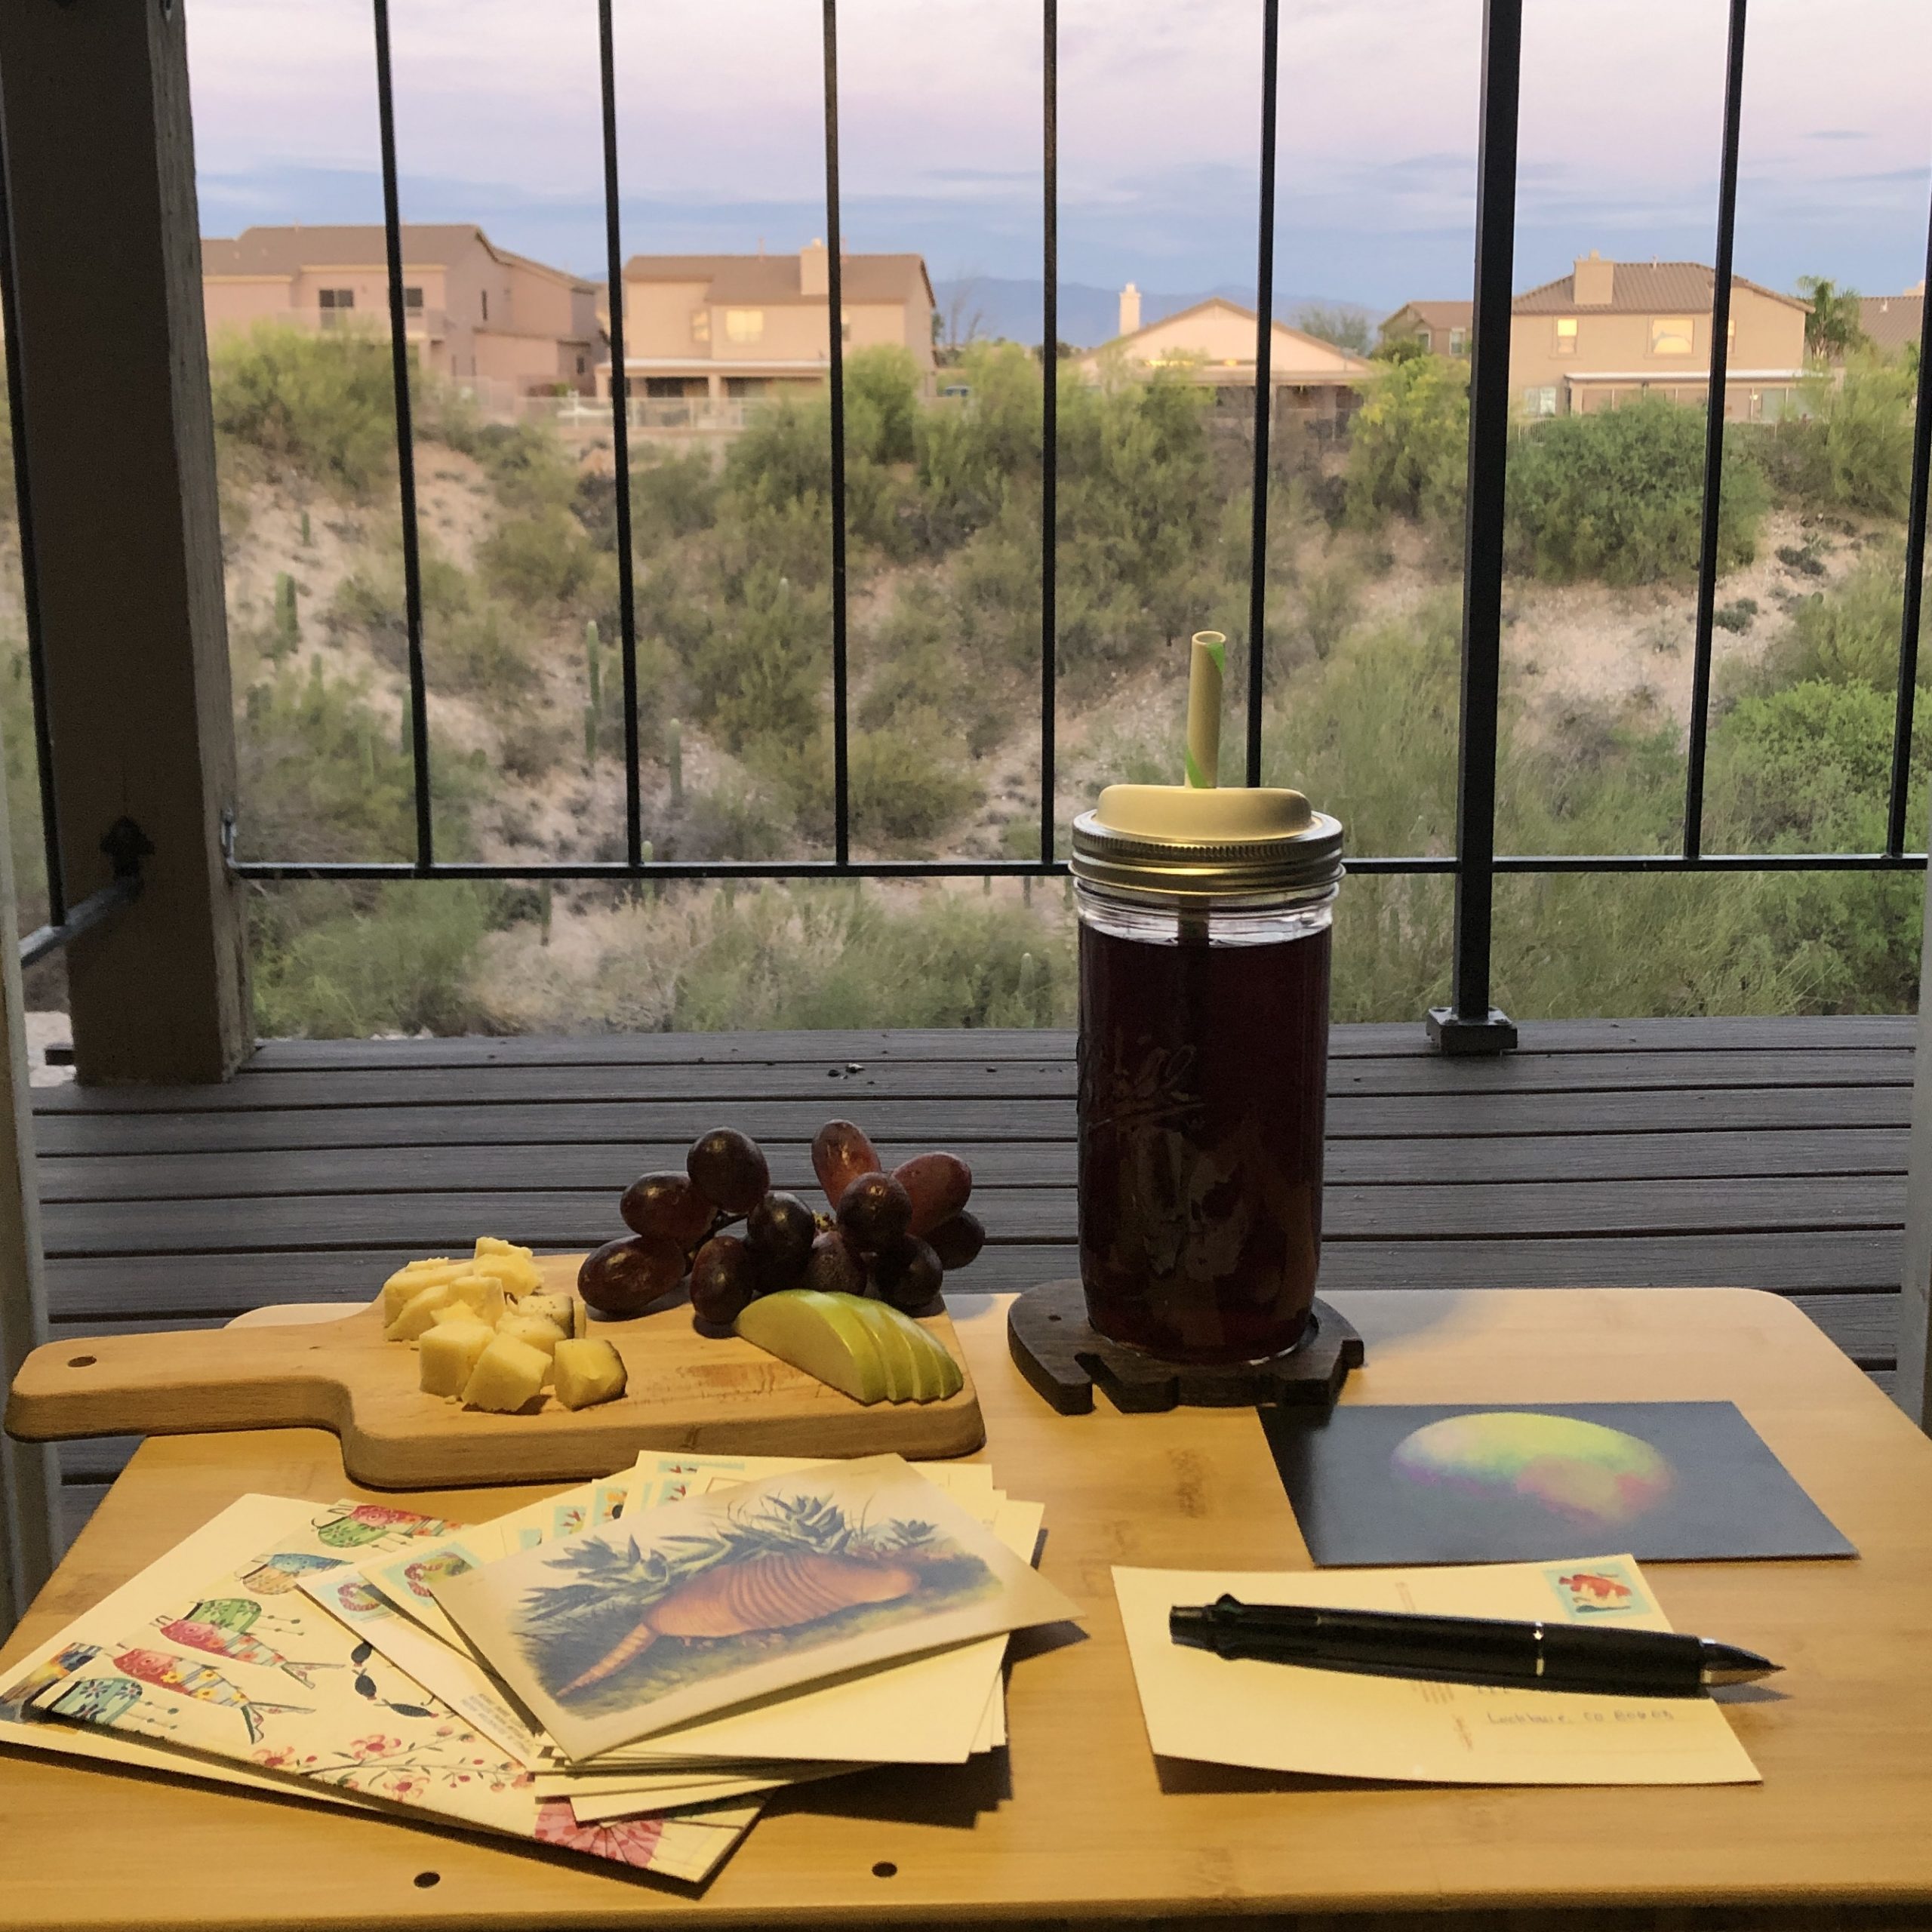
It’s an arduous task, but I manage it in stages through the week. I eagerly look forward to spending my Friday or Saturday evening binge writing through postcard bundles. To be honest, I believe it’s been the only reason why I’ve been able to not lose my mind with writing my papers. Writing these cards is an enjoyable process with the right setup. Here’s some progress photos through the month:
Writing postcards 1-40 with some blooming tea and matcha roll cake. Glass teapot from Seven Cups Fine Teas in Tucson. Blooming tea from Teabloom. Matcha roll cake from Sandyi.
Writing postcards 45-60 while basking in the sunset with some charcuterie and agua fresca (jugo de jamaica). Beehive cheeses are seahive and teahive flavors from Flora’s Market Run.
Writing postcards 74-95 while spending time with my new balcony companions. Pan dulce from La Estrella Bakery (the best panaderia in Tucson) and mug is full of Ibarra hot chocolate (Ibarra >> Abuelita any day).
I’m happy to say that as of two days ago, I met my goal and completed my 100th postcard. (If you want to be fully technical about it, I mailed them out today.) It was fun to pick card designs for the recipients and allocate dedicated time away from the computer. I’ll probably do something like this again, but not to the extent of 100 postcards within only 1 month. It’s been a rewarding experience all around. The best part is that I’m starting a regular pen pal correspondence with 2 more friends!
Letter writing is a bit of a dying activity in this technological age. Despite that, I believe it’s a worthy pursuit. While email, texting, and social media allows for easy and quick access, there’s something extra special about maintaining a snail mail correspondence. After all, isn’t it nice to receive a surprise letter in your mailbox? The sillier the card, the better.
SONG OF THE DAY
Of course I’m going to choose a song by The Postal Service. Where were you in 2003? Because this song was EVERYWHERE.
Carbohydrates compose what are good in life: rice, noodles, bread. While Tucson has some very solid Asian noodle options (Noodleholics, Fatman Kitchen, Tuk Tuk Thai, Miss Saigon, Raijin Ramen…), I still reach out for the instant noodle packages that I buy from my local Asian markets. Come take a journey with me through some instant noodles I’ve been eating lately.
INSTANT RAMEN
Most Americans are familiar with Top Ramen or Maruchan when it comes to instant ramen and its affordability ($0.10/packet). Instead of Top Ramen, I grew up with my family eating Sapporo Ichiban, particularly Original flavor. You can find it at some major grocery stores, but they can be as expensive as $1/packet. My family usually buys Sapporo Ichiban packets in a 24-pack box from the local Asian market for $14ish. I grew up with my parents managing a big household, from as few as 5 to as many as 12 people, and they made sure to never skimp out on good instant noodles.
Instant ramen is only a vehicle, it is up to you to own up to the flavor you want through the toppings. I enhance the soup base with stuff in my pantry – garlic paste/powder, ginger paste/powder, chili bean paste. I squeeze in fresh lemon juice (but only for the Original flavor, doesn’t quite work well with the others). I top it off with fresh chopped green onions. The easiest protein to add in is egg. In my opinion, boiled egg is the best version. However, if not available, then I usually cook the egg in the pot while the noodles cook. I wait until the noodles soften up enough, usually about 1 minute in, then drop in the egg. I don’t like mixing the egg around, I like it practically poached. There are others who will disagree and say the mixed egg is superior, but we can all agree that ramen is not complete without egg.
Sapporo Ichiban. My childhood version was eating this with egg, fresh green onion, and fresh squeezed lemon. I’ve since enhance it with garlic paste, ginger paste, and chili bean paste. I eat instant ramen at home with a fork because I’ve been eating it like that for longer than some of XWCL’s members have been alive.
Other recommended toppings are pickled ginger, or whatever pickled vegetable is in your refrigerator. (I maintain a steady supply of pickled cucumber and yellow pickled daikon radish) Leftover meats are always great, like some beef Bulgogi or chopped pork belly. Aldo and I once went through the whole two-day process of making chashu pork. We overnight steeped soft boiled eggs in the leftover chashu pork sauce. Instead of us making our own ramen base and noodles, we served and ate it with Sapporo Ichiban. Still turned out fantastic.
The one thing I don’t like about instant ramen is how the broth thickens up after it has cooled down long enough. My best friend (hi Michelle!) recently recommended the Menraku brand to me. I found a packet locally and it costs $5 for 2 servings. I bought it while shopping at Sandyi Market, a local small Korean market near midtown Tucson. Highly recommend them for more specialty Korean items if Lee Lee’s isn’t good enough. They earned my loyalty when I found they sold my preferred brand of honey citron tea (Sura Wang).
Menraku restaurant syle ramen, enhanced with fresh green onion, boiled egg, ginger paste, sauteed mushrooms and garlic. Topped off with sparkling water.
I went a bit further for this one by adding in sauteed sliced shitake mushrooms in minced garlic. I wasn’t in the mood to drop cook the egg, so I boiled eggs separately for it. The noodles for this one is unusual in that it’s not the usual curly fried noodles but rather straight, dried noodles bundled like soba. The broth was super good and did not thicken up while eating. I highly recommend these noodles if you want to go a bit fancier at home.
INSTANT PANCIT CANTON
“Pancit” in Tagalog translates to “noodles”, and usually the word after it is the style. (Technically it should be pansit because there’s no letter “c” in the Tagalog alphabet, but it’s commonly known as pancit.) Pancit Canton is basically Chow Mein. I tasted pancit canton for the first time when I was 10 years old and relocated to the Philippines. It quickly became one of my favorite things to eat. When I relocated back to the US at 13, the only version my family could find was the original flavor. But I like the kalamansi (Philippine lemon) version, my brother liked the spicy one. When my parents traveled to the Philippines for family-related business, they always brought back shoeboxes full of those noodle packets for us. Here in Tucson, I drive to Nick’s Sari Sari Store in the east side to buy instant pancit canton. It takes me 30 minutes one way, but it’s always worth it because I get to practice my Tagalog and it’s my small dose of Filipino community in Tucson especially when I am feeling homesick. Sometimes Lee Lee’s has it, but there were a few months where it wasn’t available.
I like these noodles as they are. But, the packages are a bit small and I find 1 package not filling enough. So, I mix it up with another flavor packet. In the Philippines, we enjoy eating pancit with some form of soda. I couldn’t find Sarsi at Nick’s Sari Sari Store, so instead I’m drinking some Thai iced tea I made.
Unlike instant ramen packets, instant pancit canton comes with an additional packet filled with oil and sauce. Depending on the weather, the oil may solidify. While the noodles are cooking, I liquefy the oil by hand using my body heat. I also use this time to mix together the powder with the liquids, so when the noodles go on top, it all blends in together. Instant pancit canton also tastes really good with Chinkiang vinegar, which blends in just right with the oil.
KOREAN INSTANT NOODLES
Sandyi has a whole aisle dedicated to instant noodles that are worth perusing. I’ve only sampled saucy noodles so far and have liked each one. A lot of the noodles tend to be spicy, but note that Korean spicy is its own game. It’s a quick, compounding build-up of spicy that stays in your mouth. It makes you eat more and more, just to keep the spicy at bay. However, once your meal is over, the spicy feeling lingers away from your mouth 5 minutes later. It’s a spicy where I need to take off my jacket and socks because my whole body is warming up and starting to sweat. It’s the best kind of suffering, existing only while you are eating and not a long haunting. I love eating Korean spicy noodles in the colder months.
The first Korean instant noodle I tried is from a brand called Paldo. I picked it because I thought the picture of the chicken on the bag was cute. This one was interesting for me, because I had to save some of my starch water before straining the noodles. I followed through the process, returned the strained noodles in the pot, added the sauce packet, then mixed it together with some starchy water. I would say it’s similar to making pancit canton, but with an added step.
It was spicy indeed! I had to wash it down with a lot of roasted barley tea. You can find roasted barley packages in the Korean aisle at your local international market.
The second Korean instant noodle I tried is Chapagetti. According to Wikipedia, it’s “the second highest-selling brand of instant noodles in South Korea”. It was also featured in the movie Parasite, to which the company Nongshim released an official video on how to cook the recipe with Chapagetti. Cooking this one was interesting, because the directions tell you to dump everything in the pot and you cook it to the end. I didn’t do it that way, instead I went through the same process as the video and the first noodle packet I tried. Still came out great.
Chapagetti is based on jajangmyeon noodles. I tried to spruce it up like Noodleholics’ Beijing Jajangmyeon, but I forgot to buy cucumber when I did my grocery run. I added in fresh green onion and a fried egg. I should have cooked the egg a bit less, so it would have just the right level of runny. This is not a spicy noodle, if my Korean spicy description scared you away.
MOROHEIYA NOODLES
I first found this noodle a few years ago as the Marukai’s free sample of the day. It’s made from moroheiya (mulukhiya), which is a leaf packed with lots of nutrition. I sampled the boiled noodle mixed with miso and mustard dressing. I was pleasantly surprised by the flavor that I bought some. Here in Tucson, you can find the noodles at LeeLee’s. The dressing is sometimes available at LeeLee’s, but I’ve definitely found it at Sandyi. The package comes with 2 noodle bricks and I find that 1 brick is a fairly hearty snack. This is one of my favorite things to eat on a hot day. They also have a yakisoba version which is pretty solid.
GreeNoodle with miso and mustard dressing. Also, boiled egg on the side. Tea is the cold brew Prickly Pear Lemon Drop from Scented Leaf.
CUP NOODLE (NOT CUP NOODLES)
I know I talked a lot about packet noodles, but what about the cup variety? I didn’t eat Cup Noodles until my high school years, and I found it lackluster as opposed to cooking over a stove. I did however learn that Cup Noodles is the American variation for Cup Noodle, which is the Japanese version (source: Serious Eats). I had planned to visit the Cup Noodle museum in Yokohama, Japan during the SPIE Astronomical Telescopes and Systems 2020 conference, but alas the conference and travel did not come to be. It’s surprisingly tricky to find Cup Noodle in Tucson. I eventually found some at Kimpo Oriental Market, a Korean market on the east side of town. They sell fresh rice cakes on Wednesdays, so I’ll be back one of these days so I can make tteokbokki.
The fruits of my labor. Which one would taste the best?
Surprise – I also made a model kit of Cup Noodle! I bought the model from USA Gundam Store. It took me more time to travel around Tucson searching for Cup Noodle than building this kit, and that was 3 hours!
The flavor base for the curry and seafood versions were very solid. There was a dried potato in the curry one, but I wasn’t a big fan of its texture. I also didn’t like the texture of the noodles too much. I’ve been spoiled for too long cooking instant noodles over a stovetop that it’s very hard to go switch over to a cup version. But, that still won’t stop me from sampling other flavors as I find them.
FINAL COMMENTS
This was only a small list of instant noodles I’ve tried and enjoyed. There’s a few others I like that didn’t get mentioned. I’ve also tried other yakisoba type noodles; Sapporo Ichiban is good, but I think GreeNoodle’s is better. I’ve tried some instant udon buckets, but they were only alright. To my memory, I don’t know if I’ve tried an instant rice noodle packet that I liked enough to eat again. I do have a packet of instant pad thai that has been sitting in my noodle stash for a while now though.
Also, there’s many ways to spruce up instant noodles. I’m interested in recommendations for other instant noodles and how you spruce it up. Instant noodles may not be a complete replacement for the real dish at a specialty restaurant, but that shouldn’t stop anyone from trying to make it better from home. As Chef Jon Kung said, “take what you like and do too much, otherwise what is the point of cooking at home?”
BONUS
I watched a cute Chinese romcom movie called “This is Not What I Expected” on Netflix a few months ago. I think it’s still up there. It revolves around a very particular hotel owner foodie and a walking disaster of a sous chef. It’s cute and there are a few great scenes revolving around instant noodles! Please give it a shot if you have the time.
Instant noodle scene from “This is Not What I Expected”
SONG OF THE DAY
My favorite song by BTS is a version without them singing. (Go figure.) But if I had to pick a lyrical version, I think the Korean version is better than the original Japanese version.
It has come to my attention that it’s already February, which means CHOCOLATE. Every Valentine’s day, I prepare boxes of chocolate to give away to everyone in XWCL and my friends. It’s one of the Hallmark holidays I look forward to the most for chocolate making. Not that chocolate needs an excuse, of course.
Valentine’s chocolates for XWCL, 2018 (left) and 2020 (right). Credit to Joseph Long.
Unfortunately, the pandemic discourages in-person meetings, including our weekly research meeting. With no avenue to give away chocolate I make, I’ve been in a bit of a chocolate confectionery slump. But, it’s February, the last time I made chocolate was a year ago, and I really want to make chocolate again. Instead, I’ve decided to share this unique chocolate making experience.
RAINBOW CHOCOLATE?
A few months ago, there was a phenomena where someone made rainbow chocolate without the use of food coloring painted on the surface. The secret is imprinting a diffraction grating on the surface. A diffraction grating produces a rainbow-like effect when light shines on it. At the correct lighting, the chocolate surface should produce a rainbow-shine effect. As an amateur chocolate confectioner, a few friends sent me video variations of this challenge. I forgot about this for a while, until I was reminded that this week is Prism Week at OpSci. I figured, why not celebrate Prism week with some diffraction rainbow chocolate?
MELTING TECHNIQUE: DOUBLE BOILER
The approach I take to melting chocolates is the double boiler (bain-marie) method. You can definitely use the microwave method; I have a friend who is the head pastry chef at a restaurant and her at-home chocolate melting technique is using the microwave. The double boiler method uses steam generated by the bottom pot to heat up the underside of the top pot, which transfers heat to whatever is in the top pot. The double boiler method technique requires a bit more setup, but I have found to enjoy it better than the microwave method.
MATERIALS
List of materials, from top right going clockwise: Diffraction grating film, 13,500 lines/inch (Amazon link); Kitchen scale; Mixing bowl for double boiler; Extra bowl for seeding chocolate chips; Pot for boiling water; Silicon molds to hold grating and shape chocolate; Chocolate chips (Ghiardelli dark chocolate, 284g); Rubber spatula. Missing food thermometer.
PROCESS
Chocolate tempering: Epicurious Diffraction Chocolate tutorial: Ann Reardon Note: Melting chocolate goes very fast. Be diligent with the whole process.
Cutting the diffraction gratings.
STEP 1: Cut the diffraction grating film. The gratings will be at the bottom of the cups, where they will be molded onto the melted chocolate as it solidifies. Make sure it is diffraction side up, so the pattern is in contact with the chocolate. I put these on a tray, so when it’s time to cool, I can transfer them around easily in my kitchen.
STEP 2: Measure the chocolate. I set aside 2/3 for the first melt, then 1/3 for the seeding portion. I do the tempering method, which is when you heat up chocolate to a certain temperature, then you use the seeding chocolate to cool it down, then finish the tempering to a certain temperature. This helps the chocolate stay in liquid form for working with and produces a nice shine.
Water boiling with chocolate ready to go
STEP 3: Boil water. Do not fill the pot with too much water. The water should not come in contact with the mixing bowl. This will otherwise burn the chocolate when we put it in for melting. When the steam is getting strong enough, lower the heat to a simmer and put the chocolate bowl over the pot.
CAUTION: Be VERY CAREFUL to not get water in contact with the chocolate. This will “seize” the chocolate, which makes it look grainy. The goal is to make the chocolate look smooth. This happened to me during my first chocolate making attempts when I used a wooden spatula not fully dry.
Get to temperature. For dark chocolate, don’t go past 120F.
STEP 4: Melt the chocolate. Mix the chocolate with a rubber spatula and monitor the temperature. For dark chocolate, do not let it exceed 120F. When the chocolate is at temperature, remove the bowl from the pot and wipe the underside of condensation. Do not turn off the burner, we’ll need it for the next step.
Seed the chocolate until necessary temperature. For dark chocolate, no lower than 82F.
STEP 5: Seed the chocolate. Add in the seeding chocolate, bit by bit, until the temperature reaches 82F. If you run out of chocolate for cooling, just keep mixing until it reaches temperature.
STEP 6: Temper the chocolate. I didn’t take a photo because things were moving very fast. Here, you would put the seeded chocolate back over the bottom pot and reheat the chocolate to between 88F – 91F. I went with 90F. It doesn’t take very long to do this. Remove the mixing bowl from the pot when temperature has been met.
Transferring the chocolate to the molds.
STEP 7: Transfer the chocolate. Put the chocolate in the cup molds with the gratings. I use a spoon for quick application. A pastry bag is also really good to use, since the chocolate won’t be too hot to the touch.
STEP 8: Let the chocolate cool. You can put it in the refrigerator, which is why I had the tray for easy transfer. You can also let it cool in room temperature, if the weather is suitable. When the chocolate is hard to touch, then you can push them out of their molds.
Please do not eat the film.
STEP 9: Remove the film. The film is not edible. (If there is an edible film though, I’m interested!) The film acts like a mold, so the chocolate copies the grating pattern.
FIRST ATTEMPT RESULTS
Not bad!
I put the chocolate up against the sunlight, and you can see the diffraction rainbow patterns! It didn’t come out too well on the chocolate. The big circles are smudge marks from my fingers, since it’s very tricky to pry off the diffraction grating. But yay, I’m pretty excited this worked, even if only a little bit!
LET’S TRY IT ONE MORE TIME
The great thing about chocolate is that it can be melted again. I wanted to see if I can do better, so I did a remelt and tried again.
Here we go again…
This round, I tried with a different mold pattern. I also tried to spread the chocolate over the grating itself, like what Ann Reardon did in her video. Back they went into the refrigerator to cool.
Two separate observations. Left is the slab under my ring light with white LEDs. Right is the block outdoors, with sunset lighting. Apologies for the smudging again.
It looks like I did a little bit better the second attempt! It was already getting close to sunset, so the sunlight isn’t the same as the first attempt. The slab refraction came out very faint under the ring light. It was too difficult for me to take a photo with it in the sunset. But the block piece came out pleasantly well, despite the lighting! I’m very satisfied with these results.
SO WHAT ABOUT THE CHALLENGE?
I think it was a fun challenge. It was definitely a bit difficult. I’ve been very out of practice with chocolate making. I could have avoided all the finger smudges if I was a bit more patient. Choosing the correct side for the diffraction pattern was also a trial and error. I didn’t have a microscope available (rather, I didn’t want to drive to campus for this one thing), so I split my batch with one for the top side and the other for the bottom side. The results also did not yield much – for all the chocolate pieces I made, I only had maybe 3 or 4 successful attempts. Maybe with different setups, I could achieve a better yield.
I do recommend trying this out! Chocolate making is a very messy process though and it goes quick. It’s always satisfying to see fun results like this. It may be better to practice melting chocolate first before trying this challenge immediately.
SONG OF THE DAY
All this talk of dark chocolate made me think about black and white, like in chess. I binged watched all of The Queen’s Gambit over the winter holiday. It was the first show I managed to complete since The Mandelorian season 1 (I am very bad at watching shows). I originally came in expecting to drool over the fashion, but was rewarded with an excellent coming-of-age story.
On the topic of The Queen’s Gambit, I’d like to bring up Chess: The Musical. It also takes place during the Cold War, but in the late 1970’s as opposed to the 1960’s during The Queen’s Gambit. The musical was written by Tim Rice (famous for Evita, among other musical productions) and the music was by Bjorn Ulvaeus and Benny Andersson of ABBA. The most famous song to come out from it was One Night in Bangkok, which was a chart topper in the mid-80’s. Wilfred and I sang parts of this song when we had an overnight layover in Bangkok with Olivier, on our way to Bhutan. Olivier was very confused, but we were also in hour 25 of our 34 hour travel and already had been on 3 different airplanes by that point.
Murray Head – One Night in Bangkok
The original version I listened to was the Chess in Concert performance from 2008, featuring Adam Pascal (famous for playing Roger in RENT), Idina Menzel (Maureen from RENT and Elsa from Frozen), and Josh Groban. I low-key became a Grobanite when I first listened through this musical.